Travel Planning Board

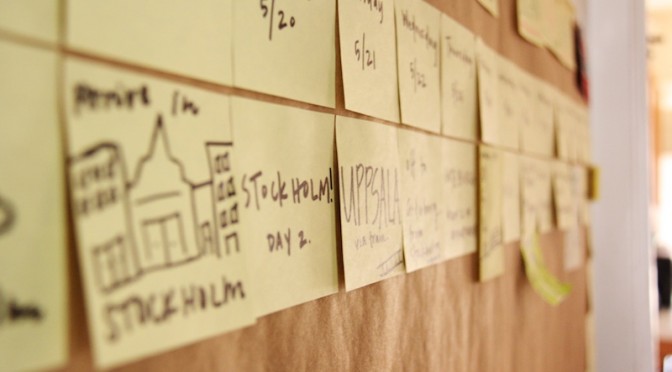
When traveling, it’s always good to have a basic plan ahead of time. Then, you can fill in the other bits with exploring and adventure! Very soon I leave for a backpacking trip through Sweden, Norway and Denmark. And, I wanted to show you the handy way my travel buddies and I planned for the trip. We taped a sheet of blank brown paper to the wall and then used post-its to mark the dates and other important info. The removable post-its were quite helpful when we had to change around the dates of the trip several times. I like the way the board looks so much, I might leave it up even after I return. How do you plan for your trips? Let me know in the comments… Keep Up With Red Leaf Style! Follow Red Leaf Style author Kirsten Hudson on Twitter @kirsten_hudson, Google+ and Pinterest....

Do It Yourself Tiered Tray

Displaying snacks on a tiered tray immediately transforms a bunch of ordinary crackers or cookies into something much more elegant. After years of working for a catering company, I know that how you present food affects how tasty it appears. Simple additions to how you place the food can make all the difference, like using a tiered tray. Tiered trays create levels, which makes a display of food more interesting and fun. Unfortunately, plate stands or tiered trays can sometimes be pricey—but not for the do-it-yourselfer. Here’s how to make a tiered tray using just a couple of plates and a candlestick holder. First, find a few plates in varying sizes. I was planning to make a three-level tray, so I found small, medium and large-sized plates at a local Goodwill. (I later decided to make a two-level tray because three levels seemed too tall.) Each plate was $0.69! Can’t beat that! Then, find a candlestick holder. (Again, I had two candlestick holders because I was going to make three tiers, but decided against it.) Any candlestick holder will do. You can always paint it to get the look you want. A lot of blogs out there create this...

DIY Wine Cork Bulletin Board

Hey you wine-o. Want a way to use up those wine corks? Craft a creative bulletin board with your leftover corks. This easy project only requires a pile of wine corks (get drinking), a hot glue gun and a surface for your bulletin board. I adhered my wine corks to an old bulletin board that I never used, but you could make your bulletin board out of a picture frame minus the glass, a piece of wood or any other hard surface. Just grab your glue gun and get going. I arranged my wine corks in rows, but they’d also look great laid out in different directions or in a pattern. Get creative! For just a little extra prettiness, I used vintage earrings (without the backs) to pin postcards, maps and photos to my wine cork bulletin board. Since I hung the bulletin board in my kitchen, I may switch out the postcards with recipes in the future. What do you think about this wine cork bulletin board? Have you done any wine cork projects? Let me know in the comments! Keep Up With Red Leaf Style! Follow Red Leaf Style author Kirsten Hudson on Twitter @kirsten_hudson, Google+ and...

Branch Jewelry Hanger

This project started out as a Valentine’s Day decoration gone wrong. I originally spray painted this tree branch and thought to use it to display Valentine’s Day cards clipped to the limbs with clothespins. After I did it though, it just looked silly. Really, what was I supposed to do with a card tree? Still, I was in a quirky kind of mood so I decided to use the branch to display my jewelry. I love how it turned out! Delicate necklaces draped over the limbs look slightly airy, and I adore the touch of whimsy with my metal owl nestled in the back. All you need to create your own branch jewelry hanger is to scope out the perfect branch. Look for lots of limbs and check it for sturdiness. Then, spray paint the branch in your color of choice and secure it to the wall. (I just used a couple of nails.) Done! An easy and lovely jewelry display. What do you think of this quirky way to display jewelry? Would you ever use a tree branch to show off your baubles? Let me know your thoughts in the comments… Keep Up With Red Leaf Style! Follow Red Leaf Style author Kirsten Hudson on Twitter @kirsten_hudson,...

Do It Yourself Hanging Collage

If you need an easy way to fill a blank wall, go for a simple hanging collage. It creates a lot of drama without much effort. It’s inexpensive. It’s completely customizable. And, it doesn’t require you to be handy with any tool more difficult to use than a hammer. Basically, you just string up a length of picture hanging wire supported by nails. Then, you use small binder clips to secure photos, magazine clippings and any other pretty papers you want to the wire. (Step-by-step instructions are at the end of the post.) When I first hung this collage in my living room, I had some decorating issues with it. See… Whoa. Way too much going on. It seems that I wanted to hang pretty much every postcard, photo and stray paper I had available on my collage. Don’t do this. It’s unorganized and cluttered. Instead, do this: Keep your papers and images evenly spaced. If you leave some room in between each paper, it creates a clean look. I also like the idea of picking a “theme” for your collage. That way it’s not too random. I chose travel. Thoughts of wandering and discovering new places inspire me. Plus, I already had a box full of various papers I accumulated...