Wooden Chair Makeover: Before

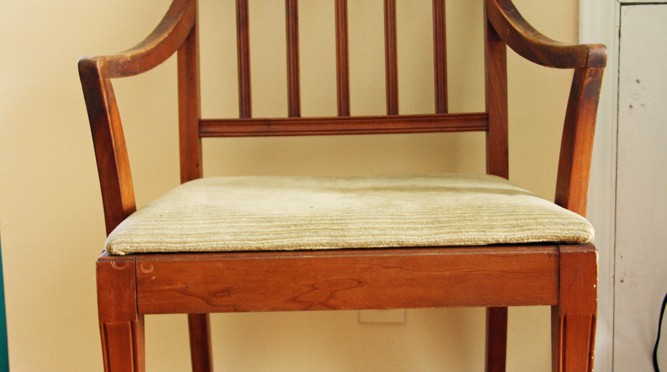
Can you believe that I found this pretty piece on the side of the road? Yep. I spotted her in a pile of garage sale leftovers bound for the trash. I saw the potential for a stylish chair immediately. You can see right away that the bones are good. Sleek arms and engraved details. Even though the cushion is mighty stained and one leg was slightly cracked, I knew I could transform her. Look out for a full makeover soon! What do you think of this chair? Do you think she can be saved? Keep up with Red Leaf Style! Follow Red Leaf Style author Kirsten Hudson on Twitter @kirsten_hudson, Google+ and Pinterest. This is the twenty fourth post in a 31 days blog series called 31 Days of Reimagining. Start from the beginning....

How to Make a Halloween Scarecrow

Get your front porch ready for fall with an easy-to-make Halloween scarecrow. I spotted this cute scarecrow lady at my favorite local coffeeshop, City Market Coffee House. The collection of restaurants, shops and bakeries in the area were having a scarecrow-making contest and this one won second place! I asked the owner, Nikole Ammer, how she made her scarecrow. It doesn’t take a lot of effort—or supplies—to put together a similar scarecrow for your front porch. Here’s what she did, adapted for you. Pumpkin face Choose a pumpkin with a nice long stem for a quirky nose. Use craft paint to create a face around the stem. Scarecrow style Grab a shirt, pants, boots, hat and gloves from a local thrift store. (Nikole made this cute scarecrow lady’s pants out of coffee bean bags. She sewed them herself. So clever!) Body build Stuff the clothes with straw. You can also cheat a little and use newspaper if you don’t want to buy straw. Safety pin the shirt and pants together for extra support. That’s it! Sit your scarecrow on your front porch swing or up against a wall. Add a few pumpkins and maybe even some straw bales for...

Reimagining Inspiration: 5 Do-It-Yourself Projects

If you’ve been following my blog, you know that this month I’ve taken a 31 day blogging challenge. Meaning, I’ll be posting every day in October on one topic. After thinking about what I tend to write about on my blog anyway, I chose 31 Days of Reimagining as my topic. I get a little decorating kick out of reimagining home décor in fresh ways. I wanted to share five do-it-yourself projects from my blog where I did just that. You’ll see purchases from thrift stores, stuff bound for the trash and even items from my front yard, all reimagined in new ways. I hope they give you some reimagining inspiration for your own home. 1. Branch Jewelry Hanger Dangle your necklaces from a pretty jewelry holder crafted from a tree branch. See how to make this quirky-cute jewelry holder yourself. 2. Wine Cork Bulletin Board Turn leftover wine corks into a pretty project for your kitchen or office. Find out how to make your own wine cork bulletin board. 3. Easy Tiered Tray Create your own pretty tiered tray using just two thrift store plates and a candle stick holder. Get instructions on how to craft your own...

How to Make Beeswax Candles

Candles just make a home feel cozy. It’s something about the soft flickering light, I think. It sets a relaxing mood. With their golden yellow color and light honey scent, beeswax candles are the cozy of the cozy. I’m slightly obsessed with them. Partly because I know that most candles you buy are made with paraffin wax, a by-product of oil refining. They also usually contain synthetic fragrances, which are also made from petroleum. Between the paraffin wax and the synthetic fragrances, many conventional candles seriously pollute your indoor air. The soot created by these candles (I know you’ve seen this black residue on your candles) is extremely toxic. It contains toluene and benzene, volatile organic compounds linked to cancer and neurological damage. Beeswax is the only naturally occurring wax on earth. And unlike candles made from paraffin wax, beeswax can actually cleanse indoor air. If that’s not enough reasons to make your own beeswax candles, just look at how cute they are! Here’s how to make your own. You’ll need beeswax, candle wicks and jars. I bought five pounds of beeswax from this seller on eBay. It came in these awesome stamped chunks. I already had the wicks from a soy...

DIY Baking Sheet Magnet Board

At some point all baking sheets look like they’ve suffered through some kind of baking battle. They’re battered, stained and no longer shiny. When you decide your baking sheet deserves a permanent break from the oven, why not transform it into something new for your home? It’s super easy to turn a worn out baking sheet into a handy magnet board. Made of metal, the board is naturally magnetic. And, all you need to take it from crusty baking sheet to slick magnet board is a coat of paint. I picked this baking sheet to transform because it already had holes on each end—perfect for easy hanging. After a coat of paint with leftover teal paint I had sitting around, I didn’t spend anything to make this board. Hang your do-it-yourself magnet board in the kitchen to hold recipes and notes, or use it in any other room like you would a bulletin board. What do you think of this project? Would you give a try? I’d love to hear your thoughts in the comments… Keep Up With Red Leaf Style! Follow Red Leaf Style author Kirsten Hudson on Twitter @kirsten_hudson, Google+ and Pinterest....

Easy DIY Denim Book Straps

When I cut a couple of pairs of worn out jeans into jorts (jean shorts) the other day, I had a pile of denim left over. Because I’m a no-waste weirdo, I couldn’t just toss out the scrap fabric. I might be able to something with it. Something really cool. Something unexpected. Much to my surprise, I actually did come up with a pretty neat use for that leftover material. The thin strips of denim left over from trimming my shorts work great as book straps for notebooks. You know, like the straps that go around Moleskin notebooks. All notebooks tend to expand with time and use. Their pages get all flared out and they won’t stay closed properly unless you set something heavy on top of them. Now, you have an easy (and inexpensive) solution. Strap that notebook down with a sweet denim band made from your old jeans. See…just like a Moleskin, only better! I like the clash between the industrial look of the denim and the ultra-feminine images on this notebook. You can also use the strap as a bookmark! What do you think? Would you use a scrap of denim as a book strap? Do...

DIY Cake Stand Jewelry Holder

If you can’t see your jewelry, how will you remember to wear it? That’s my problem, anyway. Instead of stashing my necklaces, bracelets and earrings in jewelry boxes, I like to use clever organization to display them. When I can see everything, then I’ll actually put it on. A cake stand makes a smart (and pretty!) way to display jewelry. Plus, it repurposes an item that doesn’t see a lot of other use. (Unless you whip up a bunch of cake stand-worthy baked goods all the time.) The dish portion of the stand provides the perfect space to corral smaller jewels and the raised pedestal  adds visually-appealing height to wherever you place it. Using a cake stand to display your jewelry couldn’t be easier. It’s the ultimate DIY. Simply take a cute cake stand and arrange your baubles on it. You can even dangle earrings off the edges of the dish. I like the look of my tarnished silver vintage cake stand, but any color would do. A glass cake stand would set off sparkly jewels nicely. Just use what you already have. You can’t go wrong. Have you used a cake stand to display your jewelry? Show it...