
Discover five reasons decorating with books can make you as happy as the day you first cracked open your favorite novel, thriller or mystery....
5 Ways Decorating with Books Can Make You Happy

Discover five reasons decorating with books can make you as happy as the day you first cracked open your favorite novel, thriller or mystery....
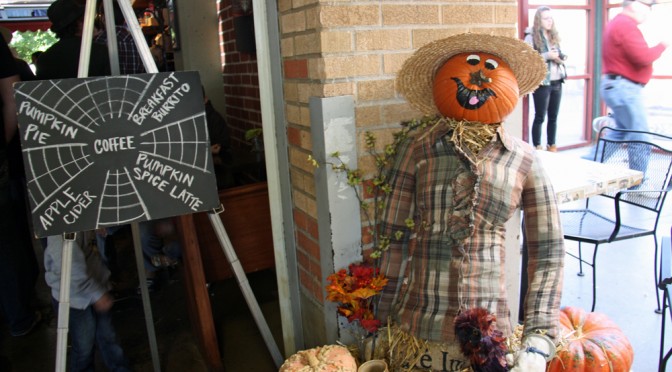
Get your front porch ready for fall with an easy-to-make Halloween scarecrow. I spotted this cute scarecrow lady at my favorite local coffeeshop, City Market Coffee House. The collection of restaurants, shops and bakeries in the area were having a scarecrow-making contest and this one won second place! I asked the owner, Nikole Ammer, how she made her scarecrow. It doesn’t take a lot of effort—or supplies—to put together a similar scarecrow for your front porch. Here’s what she did, adapted for you. Pumpkin face Choose a pumpkin with a nice long stem for a quirky nose. Use craft paint to create a face around the stem. Scarecrow style Grab a shirt, pants, boots, hat and gloves from a local thrift store. (Nikole made this cute scarecrow lady’s pants out of coffee bean bags. She sewed them herself. So clever!) Body build Stuff the clothes with straw. You can also cheat a little and use newspaper if you don’t want to buy straw. Safety pin the shirt and pants together for extra support. That’s it! Sit your scarecrow on your front porch swing or up against a wall. Add a few pumpkins and maybe even some straw bales for...
Sometimes you just need a break. I find that when I’m really frustrated with a decorating project, taking a break helps. When I can’t get an arrangement to look right or when I feel like my home just looks blah, I need a chance to clear my mind. Usually the answer to my decorating problem comes much easier after that. Tonight I need a bit of a break. I’m really proud that I’ve posted ten days straight for my 31 days blog challenge. (This blog post will make eleven.) But sometimes when you need to reimagine your home, you need a chance to let your mind wander. And, I need a bit of mind wandering time this evening. Happy Friday! Keep up with Red Leaf Style! Follow Red Leaf Style author Kirsten Hudson on Twitter @kirsten_hudson, Google+ and Pinterest. This is the eleventh post in a 31 days blog series called 31 Days of Reimagining. Start from the beginning....
I’m so not above digging through stuff piled near dumpsters or on the curb. (I get seriously excited about curb alerts on Craigslist.) Often the furniture you can find for free just needs a little fix up. Slick on a coat of paint or use a little wood glue, and you can transform pieces of furniture you found on the curb into your favorite furnishings. No, I don’t do couches or armchairs. Anything with that much fabric that has been left on the curb has an ick factor even I can’t handle. I look for wood pieces: chairs, benches, cabinets, tables. Finding furniture for free doesn’t mean you have to junk up your house. Be picky in what you choose. And know that finding that gem doesn’t happen often. It probably won’t happen the first five or even ten times you stop and check out a pile of junk. But before you dismiss me as a crazy dumpster diver, check out these five furniture finds all of which I discovered curbside. 1. Vintage writing desk Look at those legs! I adore this vintage writing desk with its detailed legs and solid wood shape. I found it a few years...
When we reimagine our homes, we come up with some pretty unique personalized ideas. If you follow my blog, you know that this month I’m doing a blog series called 31 Days of Reimagining. After a little Pinterest searching, I found five ideas that I think are particularly re-imaginative. Check them out. 1. Shutter Cup Rack Turn an old weathered shutter into cute plate and cup storage. This would be an excellent idea for my teeny kitchen. See the pin. 2. Frame Jewelry Storage This frame jewelry display gets a little extra quirk by using twigs to hold the necklaces. See the pin. 3. Chair Turned Nightstand Repurpose a pretty chair into your nightstand. Easy and budget-friendly! See the pin. 4. Pie Pan Tiered Stand Make your own three-tiered tray stand using just three pie pans and two candlestick bases. See the pin. 5. Vintage Suitcase Nightstand Crafting a nightstand out of vintage suitcases isn’t exactly a new idea, but I had to include this pin because of its cheery color combination. See the pin. Keep up with Red Leaf Style! Follow Red Leaf Style author Kirsten Hudson on Twitter @kirsten_hudson, Google+ and Pinterest. This is the eighth post in a 31 days blog series called 31...
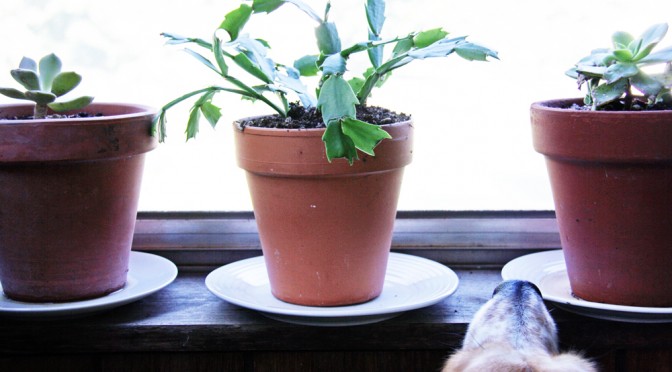
Instead of buying not-so-pretty plastic plant saucers to catch the excess water from my houseplants, I do something much more exciting. I buy cheap thrift store plates or saucers and place them under my plants. They look so much more stylish than those thin plastic saucers and they cost the same or less. I chose all white plates to give my plants a cohesive look. (If you’re wondering, that’s my dog sticking her little nose into the picture above. She thinks the thrift store plant saucers are pretty neat too.) How do you reimagine thrift store plates in your home? I’d love to hear your ideas in the comments… Keep up with Red Leaf Style! Follow Red Leaf Style author Kirsten Hudson on Twitter @kirsten_hudson, Google+ and Pinterest. This is the seventh post in a 31 days blog series called 31 Days of Reimagining. Start from the beginning....
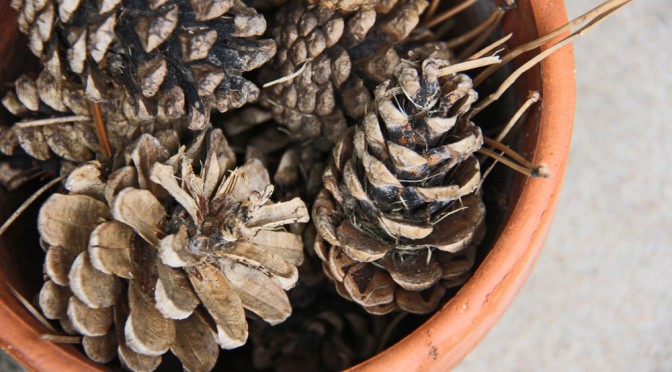
Decorating the front porch for the fall season is a must for me. Nothing looks more cheerful than orange pumpkins and bright fall mums decorating a doorstep. Even if you do something as simple as setting one pumpkin on the step and hanging an autumn-themed wreath on the door, giving your doorstep a little seasonal style will put a smile on your face every time you come home. This year I didn’t put more than five minutes of work into decorating my front doorstep. And, most of it I found by wandering around my front yard. If you reimagine how you think about décor for your doorstep, you can find what you need by just looking around your home or taking a walk around your neighborhood. Take a look at my doorstep. The pinecones were scavenged from my front yard. The mums are plants I bought last year that reappeared. They’re annuals! The mums haven’t bloomed yet, but they’ll show their cheery yellow buds soon. My boyfriend already had the antlers. And, I added a few gourds and miniature pumpkins (which I did buy this year) for color. (Please ignore the icky wrought iron screen door. It came with...