
Stripes. Animal prints. Aztec. Tribal-inspired patterns are all over home decorating and fashion right now. Take advantage of the tribal trend this season and create your own painted feathers. This is an easy craft project that’s perfect for this time of year. Put on your slippers, grab a cup of coffee and get ready to paint. Whether you want a quick-and-easy craft project or a simple decoration to spruce up your space, these DIY painted feathers are dramatic-looking without a lot of work. I came up with this project when tasked with producing a tribal-themed craft for the Fall 2015 issue of VintageKC magazine. The tribal trend is everywhere this season, but I’m much more of a neutral person. I tend to choose patterns for my home with great care—and sparingly. So, I wanted a small-scale project, where I could make something that I’d actually want to use in my home. These DIY painted feathers were just right. They display bold patterns, but on a small scale. I can easily stick them in vases or add them to vignettes without the look going over-the-top tribal. You’ll just need a few supplies from the craft store to create your own...
How to Make the Ultimate Concrete Jack-O-Lantern for Halloween
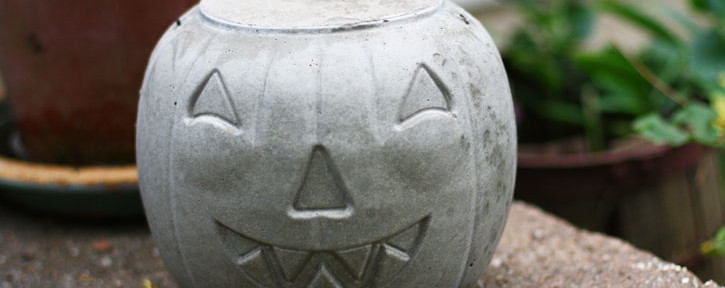
Create spooky-chic Halloween décor for your front porch when you conjure up concrete jack-o-lanterns. Made from plastic pumpkins, these dramatic decorations are surprisingly easy to make....
Pinecone Door Hanger
Want an easy way to dress up your door for fall? No project could be simpler than this pinecone door hanger. A pinecone door hanger offers a twist from the usual classic door décor: a wreath. Don’t get me wrong, I’m a big fan of wreaths—and not just for the holidays. Autumn wreaths made from faux or real branches, berries and leaves just put you in a cheery fall mood. And of course who doesn’t love winter wreaths made from evergreens? Even a simple burlap-wrapped wreath could hang on my door all year. But why not change it up? This easy-to-make pinecone door hanger requires just a few supplies, and it’s a pretty “just because” decoration. Here’s how to make your own pinecone door hanger. Break out your glue gun and some ribbon and you’re almost ready to get crafting. What you’ll need: – Pinecones (5-6) – Ribbon – Hot glue gun I found my pinecones by just taking a stroll through my neighborhood and gathering some pinecones that had fallen near the road. You too probably don’t have to walk far to find some pinecones. But if pinecones aren’t available in your area, you can easily purchase a...
Scrapbooking Fun: Mini Camping Photo Album
If you’re looking for some easy scrapbooking inspiration, then this miniature photo album just might motivate you to break out the page protectors and print some photos. It must be all of the Instagramming I’ve done lately because I’m obsessed with square photos. They just offer a more interesting look than typical rectangular photos. So, I’m really excited to share this 4X4 photo album I made featuring photos from a recent camping trip. Here it is! The most difficult part of making this photo album was printing the photos. That’s what always takes the longest. I had to sort through all the photos I took while camping (a lot) to find the best ones (not as many), and then I edited them and sent them to be printed. My favorite way to print photos is the PostalPix app for iPhone. (It’s also available for Android.) I can order photos directly from the app and they’re mailed right to my house. Of course, I also love that they offer the 4X4 option. You can order prints in these sizes: 4X4, 4X6, 5X5, 5X7, 8X8 and 8X10. PostalPix also offers aluminum prints, where photos are infused onto 1mm thick aircraft grade aluminum. I...
Easy Yarn Twig Décor
Maybe you have this conundrum too. You have a bunch of vases you love, but keeping them filled with fresh flowers just isn’t in the budget. Vases are all over my house. I kinda didn’t realize just how many until I started writing this post. I have skinny mini milk glass vases. Pottery. Mason jars. Glass vases. Bottles. They’re everywhere! I like the height they add to vignettes and displays. And, a unique vase just seems to complement any room. Because I like to keep so many vases out and about, I’m always searching for creative solutions for what to put in them. I’m not a huge fan of fake flowers, although some do work. I tend to go for more natural (and typically free) items to fill my vases, like feathers, pinecones, and cedar sticks. Maybe that sounds weird, but these items last, well, forever, and they add visual interest. While trying to come up with something new to fill a vase in my living room, I thought of twigs. I’ve used them before in vases just as is. Straight from the backyard to the vase. (Like farm-to-table, but twig-to-vase.) But this time, I wanted something different. Painting them was...
Embroidery Hoop Sun Catcher: Display Pretty Garden Blooms
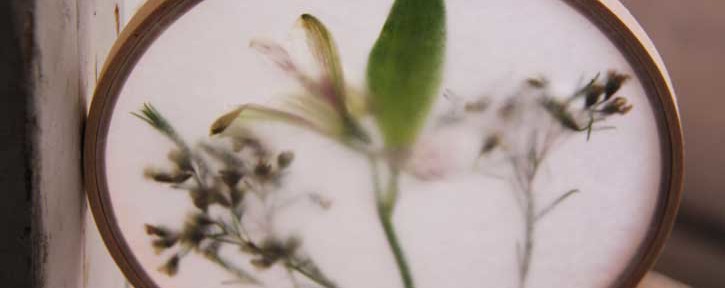
Dress up a window or door in your home with an embroidery hoop sun catcher. Made from just an embroidery hoop, wax paper and pressed flowers, it’s a no-skills required project. I love that this embroidery hoop sun catcher uses an embroidery hoop in an unexpected way. Because embroidery hoops are more than just needlecraft tools. With a little help, they can make a statement in their own right. From mobiles to light fixtures to picture frames, you can complete crafty projects galore with these versatile circular devices. So, I’m excited to share just one of those embroidery hoop projects: How to make an embroidery hoop sun catcher. Making an embroidery hoop sun catcher is simple, sweet and inexpensive. You can save farmer’s market flowers or summer blooms from your garden to enjoy all year, and you’ll have something pretty to hang in your window to catch the light. Here’s how to make your own embroidery hoop sun catcher. Step 1: Press your flowers You need something pretty to go inside your embroidery hoop sun catcher, right? What better than the delicate petals of some pretty flowers? This part of the project is a little more time-intensive, but only because...
Embroidery Hoop Art
If your walls are feeling bare as bones, but you don’t have the money to buy “art”, then this easy do-it-yourself project is for you. All it takes is some fabric remnants and a few embroidery hoops. (There’s no actual embroidering required with this project, although personally I’m eager to try that next.) Basically, you just place your fabric in the embroidery hoops, trim off the excess and hang your new hoops on the wall. See: Here I just strung several different sized hoops along a piece of twine to create a collection. The display pretties up a bare door. Fabric scraps leftover from other projects make the perfect pieces for this embroidery hoop art project because you don’t need a lot of fabric. I found my fabric remnants a while back at an estate sale for something like $1 each. (Sometimes supply hoarding turns out well for me!) But you can also find cheap remnants at fabric and craft stores. Thick paper will even work. The reddish-orange leaf pattern is actually paper not fabric. Or, you’ll even see I even used the denim leftover from cutting a pair of jeans into shorts. The leg pieces were leftover, so...