
Quick as a bunny, discover how to make a cute bunny garland before Easter. This easy Easter craft takes less than 20 minutes to create....
How to Make a Super Cute Bunny Garland
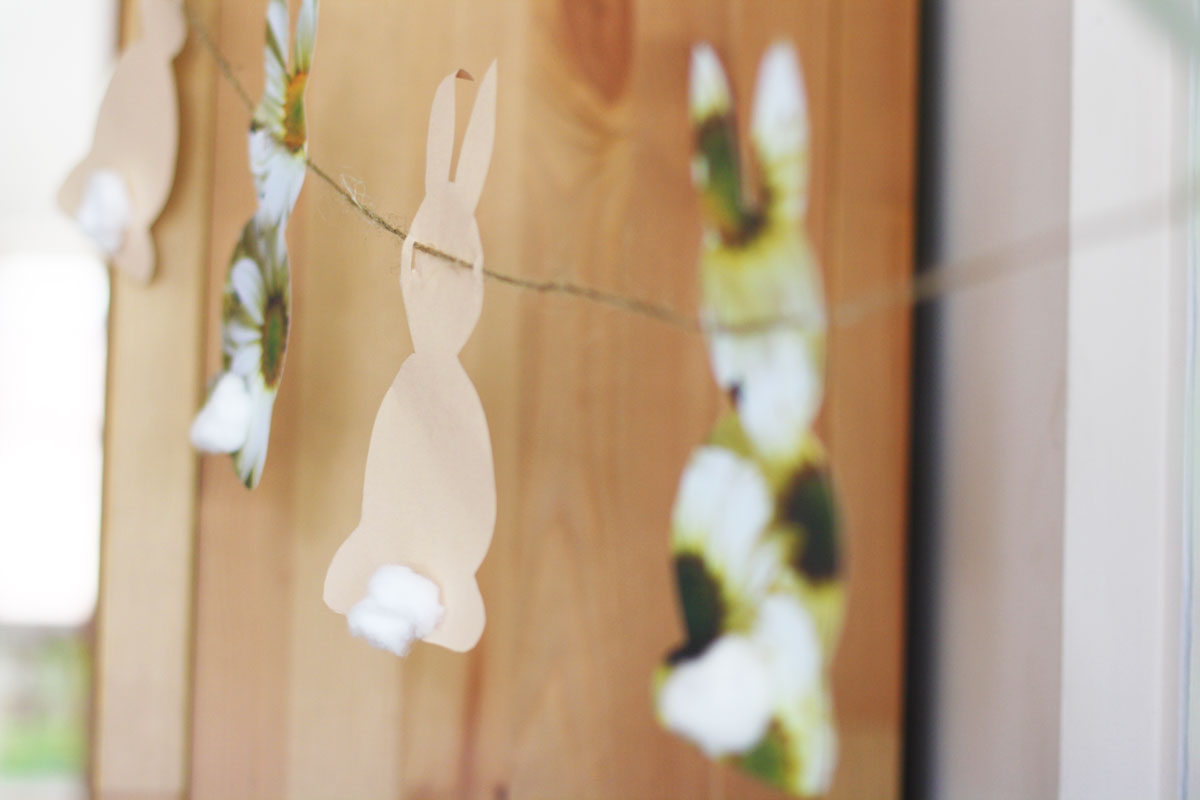
Quick as a bunny, discover how to make a cute bunny garland before Easter. This easy Easter craft takes less than 20 minutes to create....
This year, I took a cue from Scandinavian decorating to make a DIY Christmas garland to outfit my Christmas tree. (And it wasn’t just because I purchased the tree at IKEA.) Instead of a full tree dripping with ornaments, the IKEA Christmas tree encourages Scandinavian minimalism with its sparse branches. I’m not sure what it is about this look that works so well. But it does. Maybe fewer branches mean making more thoughtful ornament choices, since you only have so many branches to hang them on. Or, maybe it’s the deliciously rustic quality of it. As if it was a real tree—imperfections and all—chopped down just outside my door. Or, maybe the simplicity is what makes the tree. It’s not decked out in twinkling lights or shrouded in sparkly twine. Whatever it is, I needed an equally rustic and uncomplicated garland to drape on the tree. When looking at my craft supplies, I saw a bowl full of wood chips and a bag of pompoms and I knew I had to make a DIY Christmas garland using the two. Here’s how to create your own wood chip pompom garland. Gather your supplies together to make your DIY Christmas garland....
You can certainly buy your own garland to hang over your mantle or wrap around your staircase railing this holiday season, but why not make your own? While garland made from real or artificial greenery is traditional, this ruffled burlap garland is more unexpected. And, it will add rustic charm to your holiday décor. Even better? You don’t need to be super crafty to make your own holiday burlap garland. It’s actually really simple. You’ll feel all cheery inside when you drape your completed DIY burlap garland along your staircase railing. Here’s how to make it. Made from 5-inch rolls of burlap fabric, there’s no cutting required. You’ll need just a few other supplies to get started. What you’ll need: – Burlap fabric roll (I used two rolls of 5 inch x 10 yards that I got at Walmart.) – String (a neutral color works best) – Safety pin – Scissors This is a great craft project to do while watching T.V. Once you get the hang of it, the repetition takes over, and you’ll be done before you know it! Step 1: Measure your string First, you need to determine how long you want your garland to be....
I’m always looking for a yarn craft. Yarn is inexpensive and versatile. I like using it because I don’t feel bad when I mess up, which tends to happen. I’ve really enjoyed crocheting and finger knitting recently, so when I came across yarn pom poms, I knew I wanted to try to make them. Making yarn pom poms was a super simple craft and fun to do. Here’s a quick tutorial that explains how to make your own yarn pom poms. A few tricks to keep in mind You can use anything to wrap the yarn around. It doesn’t have to be cardboard. You can even use your hand. Just keep in mind the size of the item you wrap the yarn around will determine what size your pom pom is. Make sure not to wrap the yarn too tight. You have to carefully pull the yarn off the cardboard and keep it in place so you can tie the string around it. If you wrap the yarn too tight this is really hard to do. I learned the hard way. There are lots of different size options. I chose to make bigger pom poms, about the size of a tennis ball....
It’s almost Valentine’s Day and I haven’t decorated my home at all. I’m not big on tons of frou-frou décor anyway, but it is nice to at least recognize the holiday. So, I put together this quick project. It’s a decorative key garland. In honor of Valentine’s Day I’m thinking of it as a “key to my heart” garland. (Any other time of the year it can just be a plain ol’ key garland.) This do-it-yourself key garland is about as simple to make as it gets. Take some twine and some vintage bone keys, loop the twine through the keys, string them up and you’re done. When I think about it now, it might seem kind of strange that I just happen to have a bunch of old keys stored up waiting for me to use them in a project. You don’t have things like that just laying around your house? In that case, you can definitely scope out antique malls, thrift stores and and secondhand shops for a few of these vintage gems. They’re not too difficult to find. Would you do this five-minute project? Do you have an obsession with old keys too? I want...