
Can you believe this fluffy, snow-like wreath is made from coffee filters? Bring a wintery wonderland vibe to your front door or above your mantle by making your own coffee filter wreath. This DIY coffee filter wreath has big style, but is low budget. Grab a stack of coffee filters, make a pot of coffee (you’ll need some caffeine to power through this DIY) and get crafting. A while back I bought a pack of 700 coffee filters from Costco. At $2.59 total, I thought it was a deal that was real, and I figured they would get used up over time. Well, even with my coffee-guzzling habit, at least 500 of those coffee filters were still around after about a year. Whether you’re like me and need to use up an ill-advised bulk purchase of coffee filters or you want to make a wreath for cheap, this DIY coffee filter wreath is the way to go. You’ll need just three more supplies (besides the coffee filters) to complete the project. What you’ll need: – Wreath form (I used a straw wreath form) – Coffee filters (200-300) – Hot glue gun – Hot glue sticks Before you get started,...
Holiday House Tour 2015
Welcome to my home. It’s all spruced up and ready for the holidays. When decorating for the holiday season, I tend to think cozy. Plaid and buffalo check blankets drape over the couch. Bright colors add warmth. And this year, I’ve been into faux fur. A small faux sheepskin rug has been a staple. Right now, it’s lining the back of my couch, but I’ve also used it to cover an ottoman and I’ve also tossed it over the back of a chair. When it comes to color, I tend to decorate with the traditional red and green during the holidays. This conventional color scheme fits with my vintage-y style. And, it’s the only time of year I deviate from my beloved neutrals. (I know, it’s getting wild around here!) In typical winter fashion, the sun wouldn’t come out while I was trying to take photos for this holiday home tour shoot. So, unfortunately I couldn’t capture all the nooks and crannies where I’ve decorated my home for the holidays. I guess you’ll just have to use your imagination. Picture little toy soldiers standing guard in unexpected places and glass cloches covering mini winter scenes with teeny Christmas trees....
Cookie Cutter Ornaments With Old Photos

Trim your tree this year with ornaments that have a personal touch. Made from aluminum cookie cutters and old photos, these do-it-yourself ornaments showcase family members present and past. These ornaments are super easy to make. Just whip out your grade school skills of tracing, cutting and gluing, and you’re good to go. Whether you need an inexpensive method to fill your Christmas tree or a creative way to personalize your tree, these cookie cutter ornaments are eye-catching and easy-to-make. I came up with this project when tasked with producing a Christmas-themed craft using old photos for the December issue of VintageKC magazine. I didn’t have any old photos on hand, so I headed to my favorite antique mall. As I sifted through bins of black and white photos, I couldn’t help but feel sad for the people pictured. How had the photo memories of their marriages, babies and special events ended up in a nameless bin? At least the few I took home with me would find new life, if only on a stranger’s Christmas tree. I also found a few aluminum cookie cutters for $1 each at the antique mall. Besides your cookie cutters and old photos,...
5 Easy Christmas Decorations (Ones I Love!)
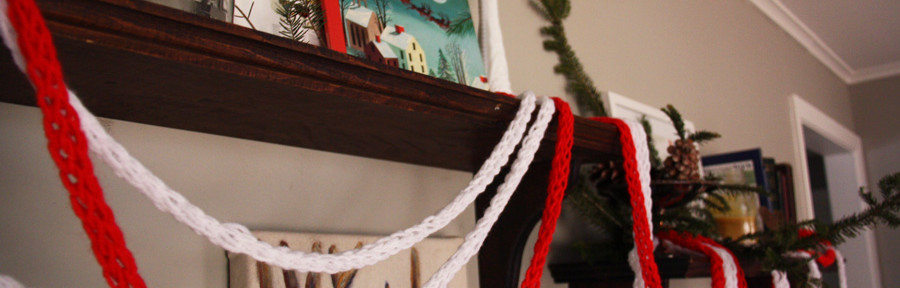
When decorating for the holidays, I like to keep it easy. I challenge myself to (mostly) decorate with only recycled items and items I already own. This year, I want to share my favorite items to decorate with for Christmas, and how I’ve used them in my home. 1. Decorating with fresh greenery The trimmings from my real Christmas tree make the perfect decorating accompaniments for the rest of the house. For example, I stick leftover boughs in vases and mason jars, and then place the “bouquets” throughout my house. This year, I used them to decorate my fake mantle (really just shelves above my couch.) They add greenery that lasts. You don’t have to water them or pay attention to them. Plus, they smell divine. 2. Draping a finger knit garland on the mantle Last year, I discovered the wonders of finger knitting while I was in bed with the flu for three days. Finger knitting is an easy peasy craft. And, it makes one long strand, like a garland. There are tons of tutorials out there that can show you how to finger knit far better than I can. Give it a try! It’s super easy. I made two strands...
Toilet Paper Roll Snowflake
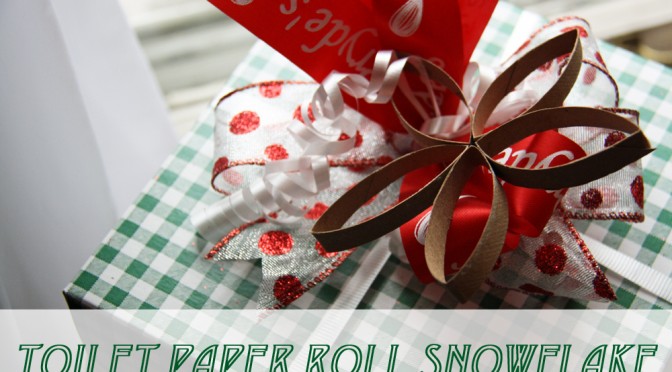
Are you wrapping some last-minute presents today? I know I still have a few to wrap. Just because it’s last minute, doesn’t mean you don’t have time to make each present special. This tutorial will show you how to make a pretty snowflake to top your presents in just minutes. Plus, it uses something we all have around the house—toilet paper rolls! Here’s how to craft your own toilet paper roll snowflake. Gather a bunch of toilet paper rolls or paper towel rolls. Flatten the roll and then cut segments at about 1/2 an inch. Keep cutting and you’ll have a bunch of petal-shaped pieces. Next, hot glue your pieces together in the shape of a snowflake. I just put a tiny dab of glue on the corner of one piece and stuck the other corner to it. Then, just go around in a circle. I used five pieces to make my snowflake, but you can use as many or as few as you like. After all, no snowflake is the same. What do you think of these toilet paper roll snowflakes? Let me know in the comments… Keep Up With Red Leaf Style! Follow Red Leaf Style author Kirsten...
Christmas Mantle 2013
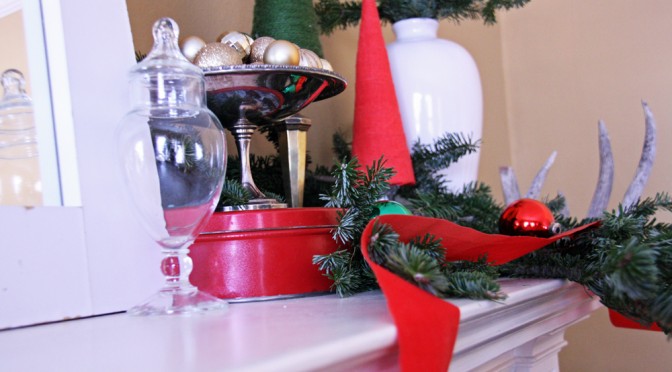
Welcome to my Christmas mantle this year. I went with super traditional red and green, with a bit of gold metallic mixed in. What’s most exciting about my mantle though is that I decorated it for the holidays without buying anything new! After shopping around the house for items I liked, using last year’s Christmas ornaments and repurposing branches trimmed from the Christmas tree, I had a pretty display. I already had all of the containers, candlesticks and tins used on my mantle. I don’t remember when I bought the big wide ribbon. It was in my Christmas storage box, along with all of the ornaments. I guess I did buy the supplies to make these Christmas tree cones. (But it cost me less than $4 to make the three cones.) Instead of garland, I used the branches trimmed off the bottom of my Christmas tree. The antlers (found on the ground by my boyfriend) seemed appropriate for this time of year. Does it look Christmasy in my home or what? What do you think of my mantle this year? Let me know in the comments… Keep Up With Red Leaf Style! Follow Red Leaf Style author Kirsten Hudson on...
Decorating For Christmas: New Holiday Art Print

I’ve been obsessed with a trend I’ve noticed around the home blogging world lately: decorative pillows with holiday sayings on them. One of my favorites is this “Baby It’s Cold Outside” pillow over at The Nester. It’s an unexpected touch of festiveness without looking over-the-top Christmasy. I think I’m also into mixing words/type into home décor right now. As a writer, I’m a big word nerd. I didn’t feel like committing to a pillow. (I’m hard on them.) So, when I spotted this print with its modern merry look, I had to have it. I don’t even remember how I found the artist, Lindsey Nichols at The Curious Nickel, but when I saw that she was based in Kansas City, Missouri I was even more excited because buying her print meant supporting local art! Well, this pretty baby arrived today! I popped her into a simple black frame I already had, and right now she’s hanging out on my mantle. I’ll probably move her around the house several times and I can’t wait. Psst. Lindsey’s having a sale over at her shop on Etsy. Buy two 8×10 prints, get one free. I took part in her sale, so I...